Tag Archives: natural mammas recipes

Veggie Stir Fry With Brown Rice – A Nutritious, No Fuss, Natural Family Meal!

Quick and healthy don’t always go together – but more and more natural mammas and pappas are making it happen!

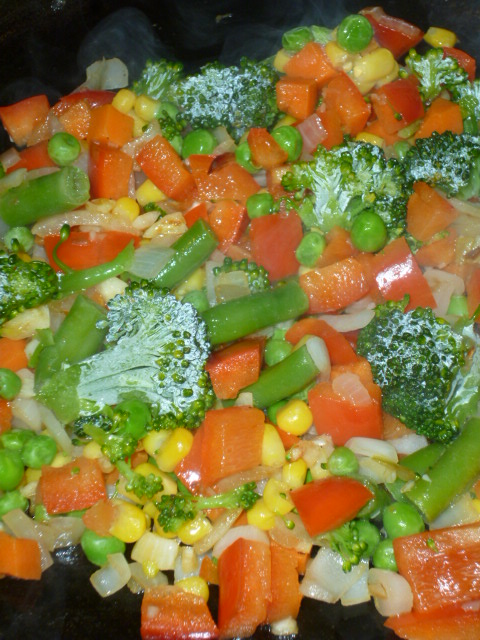
When it’s 5:00 and I still can’t figure out what’s for dinner, I used to reach for the frozen fish sticks or chicken nuggets – not anymore!  We’ve got a stash of go to quick, easy recipes the whole family enjoys.  One of our favorites, and probably one of the most healthy, is veggie stir fry with brown rice.

Stir fry is such a great natural family meal because it’s so versatile.  Got a garden bursting with _____ veggie – make a stir fry with it.  Joined a CSA – you can make a different stir fry each week with whatever they give you.  Cleaning out your fridge and have some lone veggies?  Use them up in a stir fry!

Of course like all other meals you could actually plan a specific type of stir fry, and you can add meat too.  Or give it a bit of oomph while keeping it vegetarian by adding some seasoned tofu or tempeh.

Best of all, if you have a large family like we do, stir fry is excellent because everyone can have what they want usually with minimal fuss.  Add some soy sauce, hot sauce, or other seasonings you like and you’ve got a meal any natural family will love; and that’s easy to prepare, even in a pinch!

The one thing is it does take about 20 – 30 min to cook the brown rice.  One of the ways around this issue though is to make a bunch of brown rice one night then store the extra in the refrigerator.  That way it’s ready and waiting for whatever veggies you want to ad, as well as for other meals too like bean and rice burritos, or as an awesome side dish.

veggie stir fry and riceYou can also make stir fry quicker and easier by cutting up the veggies in advance (a great idea for making salads easier too).  You might also consider keeping a bag of organic frozen mixed veggies on hand; which will cut your prep time down considerably.

Best of all though, everyone will enjoy this yummy family meal, and, you can even puree some for the baby if needed!  Plus, this meal is super affordable, a great way to use up left overs, it’s nutritious, and, we’ll just say it again, it’s EASY!

Fix up a stir fry tonight and see what we mean!  Most likely, it’ll become a staple on your weekly natural family menu too.

PS – we’re feeling lazy – and are wicked busy right now too (like always!!) – so we didn’t include a recipe.  While it’s pretty basic, if you feel like a recipe for stir fry will help let us know and we’ll add one right away!

Apple Crumb Muffins Everyone Will Love

My youngest always loves to “make something”.  Most days we spend at least a bit of time in the kitchen cooking something he can help with.

Cooking with kids is fun and helps them in so many ways…but you have to be safe of course too.  That said, there’s tons even the little ones can do in the kitchen to have a great time while learning about food, nutrition and more!

Many of our go to recipes when we’re cooking together are baked goods because they usually don’t require the stove all that much.  And, also, because he loves muffins!

This recipe for apple crumb muffins is one of our favorites.  Everyone in the family actually likes them and they’re fairly healthy.  Some may want to reduce the sugar, and you could replace the butter with olive oil or all applesauce.  We also like to increase the apples a bit here too!

Hope you enjoy this muffin recipe as much as we do and, if there’s a little one in your life, consider sharing the cooking duties with him or her and enjoy the fun!

Apple Crumb Muffins
Recipe type: quick bread
Prep time: 
Cook time: 
Total time: 
Serves: 16
 
Ingredients
  • 2 C flour
  • 1t baking powder
  • ½t baking soda
  • ½t salt
  • ¼ C butter
  • ¼ C applesauce
  • 1C sugar
  • 2 eggs
  • 1¼t vanilla
  • 2 C apple chopped
  • FOR CRUMB TOPPING
  • ⅓ C brown sugar
  • 1T flour
  • ½ t cinnamon
  • 2T butter
  • 2T oats
Instructions
  1. Preheat oven to 375F and prepare muffin pans.
  2. In a medium bowl mix flour, baking powder, baking soda and salt.
  3. In a large bowl beat together butter, applesauce, sugar, and eggs until smooth.
  4. Add vanilla and apples
  5. Gradually mix in the dry ingredients.
  6. Add mixture to prepared pans by filling each muffin cup to approx ½ full.
  7. In a separate bowl mix sugar, flour and cinnamon.
  8. Cut in butter until you get a mixture that looks like coarse crumbs.
  9. Sprinkle crumbs over the tops of the muffins.
  10. Bake 15 - 18 min or until set.

Chocolate Chip Cookie Recipe For Soft and Chewy Homemade Cookies

Everyone has a favorite type of chocolate chip cookie.  If yours is soft and chewy – like the kind you find in a bakery – this recipe is for you!

We’ve tried a lot of different chocolate chip cookie recipes here and this is one of our favorites.  There’s only one problem; it’s hard to keep the cookie jar full for more than a day or so when these are in there because everyone just loves them.

Check them out for yourself today and let us know what you think.  And, if you have another favorite chocolate chip cookie recipe, share it with all of us so we can go have a taste test!

BIG, Soft, and Chewy Chocolate Chip Cookie Recipe
Recipe type: Dessert
Prep time: 
Cook time: 
Total time: 
Serves: 16
 
Ingredients
  • ¾ C butter melted
  • 1 C brown sugar
  • ½ C white sugar
  • 1 T vanilla
  • 1 egg
  • 1 egg yolk
  • 2 C flour
  • ½ t baking soda
  • ½ t salt
  • 2 C semi sweet chocolate chips
  • Unbleached parchment paper for cookie sheets
Instructions
  1. Preheat your oven to 325 F (165 C)
  2. Line cookie sheets with parchment paper
  3. Melt butter
  4. Cream melted butter, sugar, brown sugar together in a large bowl
  5. Add vanilla, egg, and egg yolk
  6. Sift flour, baking soda, and salt together
  7. Add flour mixture to the rest of the ingredients and mix until well blended
  8. Add chocolate chips
  9. Drop dough by ¼ C onto the prepared cookie sheets about 2-3 in apart
  10. Bake 12-15 min - the softer you like your cookies the less you should bake them.
  11. Let set on the cookie sheet a few minutes, then move to a wire rack to cool