All posts by The Natural Mammas

Natural Remedies For Static Cling To Keep Things From Getting Too Charged!

During the winter static cling can become quite a nuisance. From pants attached to your legs, to a rogue pair of underwear sticking to your back, static electricity is a real drag.  But, what can you do?

Dryer sheets are some of the most popular solutions to keep clothing from putting out a little charge but, they’re toxic and can actually make you sick!  Best not to go that route.  Instead, we’ve gathered up this list of natural remedies for static electricity to help you keep away the static cling and the icky chemicals!

Vinegar

1/4 C Vinegar can be added to you wash and/or rinse cycle to get rid of static cling (and whiten whites, get rid of odors and so much more!).

Borax

Add 1/4 C of Borax to your load during the wash cycle and your clothes won’t stick to you or anything else anymore!

Natural Fabric Softeners

There are a few companies that make natural fabric softeners out of ingredients that are much safer for you and the environment than traditional fabric softeners and dryer sheets.

Body Lotion

If you run into a problem where you have static cling issues and you’re already dressed, just head back in and put some lotion on the affected area – the cling will be gone instantly!

drawing of clothes on line for natural remedy for static clingLine Drying

Using the dryer is the main source of static cling, line dry and it’s gone.  Drying your clothes on the line is a lot easier said than done in the winter though. Try stringing one up in your basement and see how much less static cling you have to deal with – and how much less your electric bill costs!

Avoid Over Drying

If line drying isn’t possible, try drying your clothes less.  Take them out when they’re just a bit wet and you’ll eliminate static cling.  Setting the dryer on “less dry” can help a lot.

Dampen Things Up

If the clothes are already full of static electricity when you remove them from the dryer or when they’re already on, try wetting your hands.  Then rub them on your clothes, or  keep your hands wet while folding the laundry out of the dryer.

Metal Hangers

If you have a metal hanger it can help you get rid of static cling just by rubbing it all over between you and your clothing.  The metal helps discharge the electricity and get your clothing hanging properly again.

We’re sure that with these natural remedies for static cling you can quit the toxic fabric softeners and dryer sheets and get rid of static electricity naturally instead.

The Ultimate Green Store

Instructions For Reusing Your Old Crayons That Are Fast, Easy, and FUN!

Let’s face it crayons are lots of fun, affordable, and can be wonderful mediums for artistic expression of many kinds, but, they never get all used up.  Never EVER!  Have you ever met someone who has used up an entire crayon?

Nope.

Instead, there are always poor discarded crayon pieces floating around.   Broken, or used down to the nub they sit, all alone.  Still useful yet not really….until now!

Here are some easy to follow instructions (and lots of pictures!) to help you reuse your old crayon bits and give them new life!  The kids can help and everyone will have fun while you clear out your old crayons and make room for all these earth friendly, and Free new ones you can all enjoy making together!


Here’s What You’ll Need:

  • Old Crayons
  • Knife (preferably one you don’t care much about)
  • Cutting Board (again, not your favorite one!)
  • Molds  ~ These instructions show a heart shaped silicone candy mold because we made them for Valentine’s Day gifts, but, you can use any other shape or type of mold that can go into the oven.

And Here’s What You’ve Gotta Do:

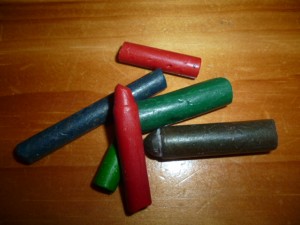
First, gather up all your old crayon bits and peel them.  Use a knife to slit up the paper to make this quicker.  Peeling regular style with your trusty old hands isn’t really that big of a bother though and would be the only way for the kiddos as the knife can slip.


peeled crayons ready for reusing


Next, you’ve got to decide why type of crayons you want to make, multi-color or solid.  If you want to make multi-color reused crayons then just throw all the peeled crayons into a pile.  If you’re going for solid or at least nearly single color (say all the lighter greens together) then sort them now and separate each color into its own container.

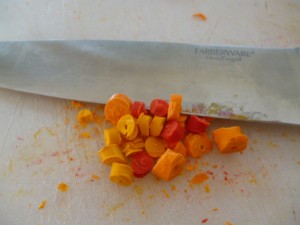
Now, chop up the crayons into smaller bits.  You don’t need them too small but if they’re too big they’ll take longer to melt.


chopped crayons for reusing


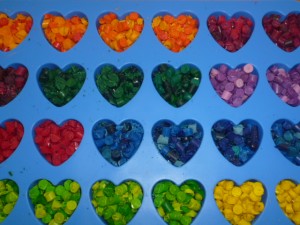
Put your chopped up crayon pieces into the mold you’re using.  If you’re making multi colored crayons you could also just put them into a big bowl at this point then divide them into the molds when you’re all done with chopping if you prefer.

As you can see with these instructions then chopped up crayons in the photo are the same basic color (all various shades of orange) but not just one solid color.  They still went straight into the mold to keep them separate and clean while chopping all the other crayon colors.


reused crayon pieces in molds


Preheat your oven to 230 degrees.  Then, once you’ve got all the chopped crayon pieces situated into the molds put the mold onto a cookie tray and put the tray and the mold into the oven.

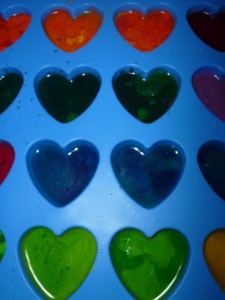
Bake for about 15 – 25 min or until all the crayon pieces seem to have melted.  The total time they spend in the oven will depend on the size of the mold you used.  When they’re done, they’ll look like this…


reused crayons all melty and just out of the oven


Take the melted crayons out of the oven and let them cool in the mold for about 30-45 min.  Again, the larger your mold size the longer until the new crayons you’ve made will be cool.  Once the molds are cool to the touch, pop out your reused crayons and enjoy!


reused crayons finished and in a rainbow of colors


Making these earth friendly crayons is fun for the whole family, and can be a fantastic project for church groups, art classes, day care centers  and other places where poor old useless crayon bits linger.

Also, you can bag a few of the finished crayons up and they make great green gift ideas for kid’s birthday parties, Halloween, Valentine’s Day, Christmas and more!

Hope you enjoy these instructions for reusing your old crayons, and let us know how the project goes!

Corn Chowder – A Recipe Perfect For Those Cold Winter Days

Homemade Corn chowder is a nice, comfort food of a soup.  Its rich, homey tastes all blend together for a wonderful bowl of soup that will warm you up from the inside out on those cold, dark winter days.

Soups can also make a nice way to extend your cooking as leftovers are so easy to heat up.

They can be great to take to friends who are ill, nursing a loved one back to health, enjoying their baby moon, or even to a pot luck too.  They freeze well and are easily transportable in a crock pot or even simply put into glass jars and re heated wherever you’re going.   Because most people, even kids enjoy a simple soup like corn chowder, it’s a vegetarian soup, and its even easy to make vegan, this soup in particular is perfect for all these occasions and more!

As far as the corn chowder recipe that follows – its incredibly easy to make, pretty quick for a soup, and comes out perfect every time!  Enjoy it with a fresh green salad and some tasty homemade bread or croutons for a naturally delicious meal that will keep your belly full and warm even when its cold outside.

Corn Chowder
Recipe Type: Soup
Prep time: 15 mins
Cook time: 30 mins
Total time: 45 mins
Serves: 8
Ingredients
  • 4 T butter
  • 2 large onions chopped
  • 3 cloves garlic minced (more if you like garlic)
  • 5 C vegetable stock
  • 3 medium potatoes chopped
  • 1 C (8oz) creamed corn
  • 2-3 C fresh or frozen corn kernels
  • 1 C cheddar cheese
  • 1/4 C milk or cream (optional)
  • Fresh chives to garnish
Instructions
  1. Heat butter in large sauce pan and add onions and garlic to cook for about 5 min.
  2. Add vegetable stock and bring to a boil
  3. Add potatoes
  4. Simmer uncovered 10 min.
  5. Add the creamed corn and corn kernels and bring to a boil.
  6. Reduce heat and simmer for 10 min
  7. Stir the cheese through
  8. Add cream or milk
  9. Garnish with chives and serve